Tuesday, June 30, 2009

Menu Tuesday

Well, I hope everyone had a fantastic weekend. 'Cause I sure did! Destin was awesome and we were very sad to leave. But it's nice to be home and sleep in our bed with our doggy who we missed ALOT.

So this week should be yum! I am literally counting down the hours till I get to eat ribs on Saturday. We are headed to the Big Easy for a huge 4th of July bash with some of our friends. Mr. ShoeFanatic will be bringing Cream Cheese/Bacon Jalapenos to grill and they are gooooood. I'll make sure he blogs about that.

Tuesday--Shrimp Tacos (not these; probably a variation of this)
Wednesday--BBQ Chicken Quesadillas
Thursday--Red Beans & Rice
Friday--Leftovers
Saturday--RIBS!
Sunday--Smothered Chicken & Eggplant

Oh and Blogger gets a huge FAIL from me. I had a post scheduled for Thursday morning congratulating the Tigers on that AMAZING win over Texas on Wednesday night and for some reason it didn't post. SO...

GEAUX TIGERS! 2009 CWS Champions!


Wednesday, June 24, 2009

Mushroom Alfredo Pasta


I always have a hard time coming up with side dishes. I would say that 95% of the dishes we cook are served along with pasta or rice. You see, while I married a carnivore, my husband married a carboholic. I can deal with no protein in a meal but you better give me my carbs!

I was racking my brain on side dishes for the stuffed chicken and thought of this while in the grocery store parking lot.

INGREDIENTS:
Olive oil
1/2 onion, diced
1 T minced garlic
8 oz crimini mushrooms, sliced
1 jar Classico Alfredo sauce
4 oz. heavy whipping cream
Fresh basil
Pasta

Boil pasta till al dente (or however you like it).

In a medium skillet, heat up your olive oil and saute onion and garlic until soft. About 10 minutes. Add mushrooms and cook until mushrooms are soft. They will probably release a lot of water so continue to simmer until the majority of the water is gone.


Turn heat to low-medium. Add alfredo and cream and continue to simmer for another 10-15 minutes. Watch it carefully so the bottom doesn't burn.

Add basil (I did it chiffonade because I like to act like Martha but chopped is just fine) and season sauce to your liking. Toss cooked pasta with sauce and serve hot.


VERDICT:
Well if I do say so myself, I am on fire tonight! Ah-mazing!

The basil really makes this dish. You can taste the freshness of it and it's soooo good.

WHEN you make this (yes, that's right I said when because "if" is not an option here) I recommend making this last. I started it early and the sauce had to sit while the water boiled which caused the sauce to get a little thicker than I would have liked. It still tasted fine but I wish it had been a little creamier.

SOURCE:
Me!

Laughing Cow & Roasted Red Pepper Chicken


So the first time I saw a recipe for Laughing Cow Cheese Stuffed Chicken, I was intrigued. I love Laughing Cow Cheese. I mean, I love it so much, that it's a problem sometimes. Like when you eat the entire wheel in one sitting. Not that I'd ever do that...

Anyway, I was always just a little hesitant to make this because I wasn't sure how Mr. ShoeFanatic would like it. He can be a little particular. But when I stumbled across this gem, a light bulb in my head went off. We don't eat a lot of Sun Dried Tomatoes but we are total whores for Roasted Red Peppers! And an idea was born...

INGREDIENTS:
4-6 chicken breasts
Seasoning (salt, black pepper, garlic powder, onion powder, cayenne)
4-6 wedges Laughing Cow Cheese (1 per breast)
1/2 jar roasted red peppers, drained & chopped
Fresh basil
3 eggs, beaten
1 1/2 c bread crumbs

Preheat oven to 350.

Season chicken breasts to your liking. Carefully cut a pocket into the side of each chicken breast, taking care not to slice all the way through. Cut each cheese wedge into 2 or 3 pieces. If you have large chicken, do 3 pieces. Like this:


If you have smaller chicken, do 2 pieces. Like this:


Insert cheese into chicken pocket evenly. Add a layer of red peppers into each chicken breast pocket and top with 2-3 basil leaves per breast.


Carefully dip each breast into egg and bread crumbs, coating evenly. Place on a greased baking pan cook for 20 minutes uncovered.


VERDICT:
Oh, yes ma'am!

These are gooooood. Like, really really goooood.

Very juicy on the inside. The mixture of the cheese and the red pepper is awesome and when you add the basil. Oh, it's so good.

Mr. ShoeFanatic had seconds. I'll be making this again. Soon.

SERVED WITH:
Mushroom & Alfredo Pasta
Green Beans

Tuesday, June 23, 2009

My Very First Award! And My 100th Post!


My good friend Christen gave it to me and I am so excited! I absolutely love blogging more than I thought I would. It's so much fun to try new recipes as well as post about some of my own kitchen creations! I really hope that I can continue to grow my reader list and that people are really enjoying the recipes I post.

Now, for the rules:
1. Accept the award, post it on your blog together with the name of the person who has granted the award, and his or her blog link.
2. Pass the award to 15 other blogs that you’ve newly discovered.
3. Remember to contact the bloggers to let them know they have been chosen for this award.

(I don't know 15 bloggers so I'm going to be a bit of a rule breaker.)

1. Sweet Tea and The Red Sox
2. There's A Bear In Your Kitchen!
3. Rules of Engagement
4. The Wilsons
5. Mrs. Almond's Joy
6. Mr. and Mrs. B

Thanks again, Christen!

ETA: I thought of another one!

Blueberry Muffins


I do believe that blueberry's are my favorite fruit of all time. I love blueberry pancakes, blueberry cobbler, blueberries in my cereal and above all, blueberry muffins.

I have been making this particular recipe for years. My youngest brother gave me this Better Homes & Gardens cookbook when I first moved to college and it has yet to let me down. I should note that the recipe linked calls for butter but my cookbook calls for cooking oil, so I used that instead. HOWEVER, I find myself using spray butter on the muffins so maybe I should consider adding it in.

INGREDIENTS:
1 3/4 c AP flour
1/3 c sugar
2 t baking powder
1/4 t salt
1 egg, beaten
3/4 c milk
1/4 c cooking oil
1 c fresh or frozen blueberries, thawed

Preheat oven to 375.

Stir together flour, the sugar, baking powder and salt in a medium mixing bowl. Make a well in the center of dry mixture; set aside.

Combine eggs, milk and oil in a separate bowl; add all at once to the dry mixture. Stir just until moistened (batter should be lumpy). Fold in blueberries. Don't overmix!

Spoon batter into prepared muffin cups; about 2/3 of the way full. (If desired, sprinkle tops with coarse sugar.) Bake 20 minutes or until golden.


VERDICT:
Yummy as always! I actually think it could use more than 1 cup of blueberries but I tend to go overboard on things. Regardless, these are tried and true. A hit every single time!

SOURCE:
Better Homes & Gardens

Monday, June 22, 2009

GEAUX TIGERS!

I just need to give my LSU Tigers some serious props here. They just beat Texas in Game 1 of the CWS in the 11TH INNING!

Game 2. Tomorrow. 6pm. Be there!

Meatball Stew


Now, THIS is authentic Cajun cooking at its finest. My mom didn't cook this very often (however Mr. ShoeFanatic makes a meatball stew that will make you weak in the knees).

As soon as I saw Christen post this recipe in her blog, I got homesick and knew that I had to make it. Christen's recipe actually doesn't use the roux; she makes a true grease gravy. But sadly, I've never been very good at making grease gravy so I resorted to my old faithful jar of roux. I made a few other changes but I can assure you that both ways are delish!

In case you're wondering, this is not healthy for you. At all.

INGREDIENTS:
1 1/2 lbs ground beef
Seasoning (salt, black pepper, cayenne and garlic powder)
1/2 onion, chopped
1 green bell pepper, chopped
1 T minced garlic
2 eggs
2 t evaporated milk
Canola oil (about 1/4 c)
Water
3 T jarred roux (such as Kary's or Savoie's)

Season ground beef to your likening. In a large bowl, mix beef with onion, bell pepper, garlic, eggs, evaporated milk and 2 t water until just combined. Set aside.

Spray the bottom of a heavy pot with nonstick spray (side note: Le Creuset's make an excellent roux). Heat canola oil in the same pot. Roll meatballs and place in oil until brown on the bottom. Once they are in the pot, don't mess with them! Since there are no bread crumbs they will fall apart if you touch them.

When you are sure the bottom half is browned, carefully turn them over to brown the other side. I used a large spoon and some tongs to get the job done.

When all the meatballs are brown on both sides, add 2 cups of hot water to the pot. Turn heat up to medium-high and let it simmer uncovered for about 30-40 minutes or until almost all of the water has boiled out. You should still have about an inch or so of water/grease in the bottom of the pot.

Add 2 more cups of hot water to the pot and again, let it simmer uncovered for about 30 minutes or until you have about 2 inches of water/grease in the bottom of the pot.

Add your roux and stir (carefully so you don't break up the meatballs) so that it melts completely. Add another 2 cups of water (or more) and continue simmering until you have reached your desired thickness. About another 30-45 minutes.


Season gravy with salt and red pepper to your taste.

Serve over rice.

VERDICT:
This was so amazingly good. I really, really love Christen's meatballs for the simple fact that they are really meaty. I was very scared to make them without a binding agent but I just loved the meaty flavor.

If you are looking for a real Cajun recipe, this is where you'll find it!

SERVED WITH:
Green beans

SOURCE:

Menu Monday

Happy Monday, everyone! If you've been following my Twitter updates then you already know that I am going to the beach this week. In 3 days to be exact! Mr. ShoeFanatic and I have had a lot going on lately so we are very, very excited to be able to get away for a long weekend together.

I have a few recipes I hope to post before we leave but otherwise, it'll be a slow week!

Monday-Stuffed Chicken (finally)
Tuesday-Leftovers
Wednesday-DriveThru (we have to drop the doggy off with the in-laws)

Thursday thru Monday-we'll be here:


Have an awesome week!

Sunday, June 21, 2009

Bagels!


The title has an exclamation point because I am so excited! I have been wanting to try my hand at bagels and even had a few recipes in mind (like this one and this one) but the one I decided to go with didn't require me to go to the grocery store and didn't require me to have a starter from the night before. I had all of the ingredients for these and they took under 2 hours from start to finish!

FYI--The missing bite is not from me. Or the dog.

INGREDIENTS:
~4 c AP flour + some extra
1 pkg active dry yeast
1 1/2 c warm water
1/4 c sugar
1 t salt
6 c water

In a large mixing bowl combine 2 cups of the flour and the yeast. Add the water, 3 T of the sugar and salt. Mix with the dough hook on your stand mixer on low to medium speed for 30 seconds. Beat on high speed for 3 minutes. Add another 2 cups of flour and continue mixing until well combined.

Turn dough onto floured surface. Knead in enough of the flour to make a moderately stiff dough that is smooth and elastic. Cover dough and let rest for 10 minutes.

Turn dough again onto floured surface. Divide dough into 12 portions and shape into smooth balls. Working quickly, punch a hole in the center of each ball. Pull center of dough gently and evenly to make a 2-inch hole. Place on lightly greased baking sheet; cover and let rise 20 minutes (start timing after the first bagel is shaped).

While bagels are still rising, preheat broiler on low. Also bring 6 cups of water and the remaining 1 T of sugar to a boil in a wide, deep skillet. Preheat broiler on low.

Broil bagels 5 inches from heat 3 to 4 minutes, turning once (tops should not brown). Turn off broiler; preheat oven to 375.

Using tongs, lower half of the bagels, into boiling water. Reduce heat and simmer, uncovered, for 7 minutes, turning once.

Remove bagels from water and drain on paper towels. Repeat with other half.


Place bagels on greased baking sheet. Bake for 20 minutes and then flip bagels and bake another 10 minutes.


Let cool before enjoying!

VERDICT:
I am offically going to pursue my lifelong dream of owning a bakery. These are AH-MAY-ZING! Very soft on the inside yet just a little chewy on the outside. And just look at those golden edges! I cannot wait to try making different varieties.

Stop reading and go make these!

SOURCE:

Saturday, June 20, 2009

Chicken Quesadillas


Oh I am so happy to have my camera cord back! I actually made this last week but didn't want to post it until I had photos to back up my recipe. I really love making quesadillas during the week and this is about as basic as it gets. Super easy for a weeknight meal!

INGREDIENTS:
4-6 chicken breasts, cubed
Salt & black pepper
Olive oil
1 onion
3 bell peppers (preferably in 3 different colors)
Tortillas
1 bag shredded Mexican cheese
Sour cream

Season chicken with salt and pepper to your liking. In a large skillet, coat the bottom with olive oil. Over medium heat, cook chicken until no longer pink. While that's cooking, cube bell peppers and onion.

Add veggies to the chicken and continue to cook until veggies are slightly soft (but still have a little crunch to them) and chicken is cooked all the way through. Remove from heat.


Start assembling quesadillas. On half of the tortilla, put a large spoonful of chicken/veggie mix and shredded cheese. Fold tortilla in half.

Spray a nonstick skillet liberally with Pam and grill tortilla over med-high heat or until cheese is melted. Continue for remaining quesadillas.

Serve with sour cream.

VERDICT:
We've been making this forever and it's still awesome. I really love the sweetness of the peppers after they've been sauteed. I will say that the peppers take a little longer to cook than I would like but I'm going to chalk that up to my craptastic stove!

SOURCE:
Me?

I FOUND IT!!!

FINALLY! I found the camera cord this afternoon when I was cleaning up around the house. It was in our entertainment center right where it belongs. And right where I had looked about a thousand times.

Mr. ShoeFanatic has got some splainin' to do...

Pictures of the Chicken & Eggplant Parmesan and the Homemade Sauce are up!

Monday, June 15, 2009

Menu Monday

Did everyone have a nice weekend?

BECAUSE I SURE DID!

Mr. ShoeFanatic bought me a Wii for my birthday. And I am in love. I know, it's ridiculous that someone who is 26* should be so excited about a video game but it's just so fun!

But onto more important things. Like what we're having for dinner this week!

Monday--Ground Beef Enchiladas
Tuesday--Leftovers
Wednesday--Stuffed Chicken
Thursday--Mr. ShoeFanatic (probably something with Italian Sausage)
Friday--Leftovers
Saturday--Meatball Stew
Sunday--Paninis & Soup

*As much as I love my birthday and had a fantastic weekend, I really, really, really hate that I am officially in my late twenties. I think I might try and make a deal with God regarding my desire to not turn 30.

(Name that popular 90's sitcom.)

Thursday, June 11, 2009

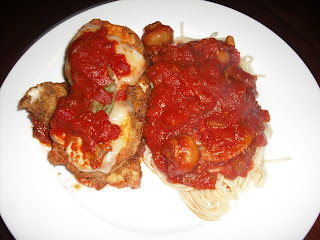
Chicken & Eggplant Parmesan


I don't think I've blogged about Mr. ShoeFanatic's garden yet? (note to self: start a post about the garden)

Well, it's fantastic. I'll get into more detail later but basically, it's producing eggplant as fast as we can cook it! Mr. ShoeFanatic requested eggplant parmesan this week and even though I've never cooked eggplant before, I accepted my challenge. The chicken was a last minute decision but an excellent one. Although, this could have easily been a great vegetarian dish.

INGREDIENTS:
3 med sized eggplants
Kosher salt
1 1/2 c AP flour
1 1/2 c Italian breadcrumbs
5 eggs, beaten
6-8 chicken breasts
Salt & Pepper
Canola Oil
1 bag shredded mozzarella cheese OR 1 block mozzarella cheese, sliced
Fresh basil leaves
1 batch Homemade Spaghetti Sauce

Rinse eggplant and peel. Cut lengthwise into 1/4 inch slices. Place a large colander in the sink. Arrange one layer of eggplant on the bottom and sprinkle evenly with Kosher salt. Repeat with remaining eggplant, salting until all eggplant is in the colander. Weigh down the slices with a couple of plates and a vase if you have one handy. Let drain for at least an hour. (The purpose of this is to have the eggplant release some of its moisture before cooking.)

While the eggplant is draining, prepare your spaghetti sauce so it can simmer. The aroma in your kitchen will rival Sophia Petrillo's.

In a wide, shallow bowl, combine flour and breadcrumbs (you made need more than called for, depending on how many slices of eggplant you have). Pour your beaten eggs in another wide, shallow bowl. Set these aside.

Place a large, deep skillet over med-high heat and pour about half an inch of canola oil. I used a candy thermometer to watch the heat. You want it to get up to about 400 degrees before you start frying.

Dredge the eggplant slices first in the egg, then in the flour mixture (side note: the original recipe called for flour then egg but to really get a good crust on it, I highly recommend egg then flour). Working in batches, slide coated eggplant into hot oil and fry until golden brown on both sides, turning once. Drain on paper towels.

At this point, preheat your oven to 350.

When all your eggplant is fried, take the chicken and season with salt and pepper on each side. Dredge in egg, then flour. Get your oil back up to about 350 and place the chicken in. BUT DON'T COOK IT ALL THE WAY THROUGH! You just want to brown the outside a little. If you cook it all the way through, it will end up dry and no one likes dry chicken.

So, brown the chicken, flip and brown the other side. Then take it out and let it drain on paper towels.

In the bottom of a 9x13 inch glass baking dish, spread a thin layer of spaghetti sauce. Place 6 chicken breasts in the pan (or however many you can fit). Top each breast with 2 eggplant medallions. Top eggplant with mozzarella slices. I used 3 slices per serving to make sure it was extra cheesy. I love cheese. Top the cheese with a fresh basil leaf (I also love the smell of fresh basil. I wish I could bottle it). Lastly, top each basil leave with a spoonful of spaghetti sauce.

Bake for 15 minutes or until chicken is cooked thoroughly. But I wouldn't go longer than 20 minutes or your chicken will be dry.


VERDICT:
Holy mother of all things green.

This is very possibly the best thing I have ever cooked. I don't even know where to start.

The eggplant was perfect. Soft on the inside and crispy on the outside. The chicken was SO moist! Usually only Mr. ShoeFanatic can achieve that kind of moistness in our kitchen but today, I surpassed him. And when they got married in that oven with the cheese and the basil. Oh, readers. It was heaven I tell you!

We'll definitely be having leftovers tonight.

SERVED WITH:
Pasta & Homemade Spaghetti Sauce

SOURCE:
Simply Recipes

Homemade Spaghetti Sauce


I know that I have proclaimed my love for Prego before. But I've been eyeing this recipe for a while now. When I told my friend (and fellow food blogger!) Christen that I was making Chicken & Eggplant Parmesan with Prego, she scoffed at me and practically demanded I make her sauce!

Ok, that's not actually how it happened but it's something like that. We all know my issue with homemade sauce is that it takes too long to cook. Well, she swore to me that her recipe didn't take longer than about an hour. So I decided to put my faith (and my dinner) in her hands.

I crossed Prego off my grocery list, added a few of the ingredients that I didn't already have and jumped right in...

INGREDIENTS:
1 pkg frozen Seasoning Blend (onions, peppers, celery, etc.)
1 T minced garlic
1 sm can mushroom pieces and stems
1 sm jar whole button mushrooms
1 can original Rotel
2 sm cans tomato paste
2 8 oz cans Hunt's Basil, Garlic & Oregano tomato sauce
2 8 oz cans Hunt's Roasted Garlic tomato sauce
2 T Worcestershire Sauce
1/2 bottle beer (we used Miller Lite)
1 t sugar
Seasoning (salt, pepper, oregano, basil, thyme, onion powder, garlic powder)
2 Bay leaves

Over medium heat, saute frozen seasoning blend and minced garlic. Cook down until veggies are soft; about 10 minutes. Add mushrooms (including liquid) and Rotel; stir well. Add tomato paste and mix until well combined.

Add the remainder of the ingredients (tomato sauce, Worcestershire, beer, sugar, seasoning and bay leaves) and let cook on med-low heat for approximately 20 minutes. Continue to season to your taste as it simmers.

Let simmer for at least 30 more minutes. The longer this simmers, the better!

Serve over pasta.

VERDICT:
Hang on one second...

::pats self on back::

This was so amazingly good!

And soooo easy! I started it while the eggplant were sweating and just let it simmer while I cooked the rest of the meal. It ended up simmering for closer to 2 hours and I am pretty sure that contributed to the awesomeness of this sauce.

Prego, we've had a great relationship but sadly, all good things must come to an end.

Thanks, Christen!

SERVED WITH:
Chicken & Eggplant Parmesan

SOURCE:
Cooking with Christen

Monday, June 8, 2009

Crawfish Etouffee

Let me apologize now.

This is going to be a pictureless post.

I should have taken a picture when we served it but I forgot. Then I reheated and honestly, it didn't look like something that screamed, "Cook me!" It's still fantastic but just didn't look it.

INGREDIENTS:
Olive oil
1 onion, diced
4 garlic cloves, diced
1 bell pepper, chopped
1 lb crawfish tails
1 can cream of mushroom soup
Water
Seasoning (salt, pepper, paprika)

Over medium heat, saute your onion in the olive oil until just barely opaque. Throw in the garlic and bell pepper and let saute until they are all soft and translucent.

Add crawfish tails and stir while it cooks for a few more minutes. Add in cream of mushroom soup and let simmer for about 10-15 minutes. Add water if it's too thick (which it probably will be). Season to taste.

Continue simmering and stirring and seasoning until you have desired consistency and taste. Serve over hot rice.

VERDICT:
Crawfish Etouffee is truly a staple in every cajun household and ours is no exception. Normally, I would start this off with an entire stick of butter but being as I value our arteries, I like to play around with healthier ways to cook it. Honestly, I think it tastes the same without the butter (although some might disagree).

You can also substitute the crawfish with shrimp.

Bottom Line: You should definitely make this even though I have nothing to visually entice you!

SERVED WITH:
Canned Corn (whole kernal)

SOURCE:
Mom

Menu Monday

Let me apologize for the lack of posts lately. I can't believe it's been 6 days since I last posted. I swear I have recipes to post, I just haven't had a chance to sit down them and clean them up yet. So stay tuned, they are coming!

Monday--Eggplant Parmesan
Tuesday--Chicken Quesadillas
Wednesday--Leftovers
Thursday--Crawfish & Cream Sauce over Pasta
Friday--Shrimp (Mr. ShoeFanatic)
Saturday--Birthday Dinner!
Sunday--Leftovers from Saturday

6 days in case you're keeping track. ;)

Tuesday, June 2, 2009

Grilled Chicken Sandwich


I can honestly say I never thought I would be blogging about a sandwich. I mean, I like sandwiches but I wouldn't call them blog-worthy.

Until I met this sandwich. (I bet you're wondering why there's only half a sandwich in the picture. Keep reading.)

It all started with the bread. Oh, the bread. It's all I can think about. So I was sitting at work today thinking about how I didn't really want Lettuce Wraps like I said I did on Monday (don't judge; I've admitted to straying before). I wanted that bread. With chicken. Mr. ShoeFanatic's juicy grilled chicken. Oh yeah.

Then I remembered I had an avocado. This was coming together very nicely in my head. I also remembered seeing a sandwich on Pioneer Woman's blog that had intrigued me. So I headed there for further inspiration.

And boy was I inspired...

INGREDIENTS:
2 chicken breasts
Rub (below)
4 slices Sandwich Bread
Cream cheese (~1/2 cup)
Green onions, diced
2 slices cheese (we used provolone)
Cucumber, sliced (I like mine with the peeling still on)
Tomato, sliced
Lettuce, washed and torn
Roasted Red Peppers (jarred or fresh) or Avocado (I left this out)

RUB:
Salt
Black Pepper
Olive Oil
Rosemary

Season chicken with rub ingredients to your liking. Grill until cooked through. Set aside while you make the rest of the sandwich.

OR while your husband is grilling...Mix together your cream cheese and green onions with a fork. Spread on one side of each slice of bread.

Layer your cucumbers, tomatoes & lettuce on one slice. Layer your roasted red peppers (or avocado), chicken and a slice of cheese on the other slice. Put the chicken side on top of the veggie side.

Cut in half and enjoy.

VERDICT:
This was seriously one of the best sandwiches I have ever had. It turns out that I did not have an avocado so I used roasted red peppers instead. I am sure the avocado would be awesome though.

I have to say that I am so in love with thise cream cheese/onion mixture. I used low fat cream cheese so I'm wondering if it wouldn't be my new mayo. Hmm...

AND the tomatoes, cucumbers and green onions were all grown in our garden! So fresh!

I was so excited about my sandwich that I started eating it before I took a picture. And the whole time I'm eating all I can think about is how I couldn't wait to blog about it! Then I realized I had no pic so I had to stop eating long enough to take one of the other half. Before I engulfed it of course.

I can't wait to have this for lunch tomorrow!

SERVED WITH:
Cucumber & Tomato salad

SOURCE:
Pioneer Woman
Me!

Bread Update!

Hey, remember last week when I made the sandwich bread? And it looked like this:


Well, I made it again last night and took Annie's suggestions of not adding more flour. And it came out like this:


Much better, no?


And this is my favorite way to eat it. With Peanut Butter!

Monday, June 1, 2009

Penne a la Betsy


Actually I guess it would be Rotini a la Betsy.

Hopefully by now you are aware that I am slowly but surely becoming a Pioneer Woman groupie. She's creeping in on Martha as my new idol. This recipe looked really good so I convinced Mr. ShoeFanatic to let me give it a go. He's had a bad experience with tomato and cream pasta before. It apparently scarred him.

INGREDIENTS:
1 lb shrimp, peeled and deveined
2 T butter, divided
Olive Oil
1 sm onion, chopped
2 cloves of garlic, diced
1/2 c white wine
1 8 oz can tomato sauce
1 c heavy cream
Fresh parsley, chopped (I left this out)
Fresh basil, chopped
Salt & Pepper
Pasta (we used rotini)

In a large skillet, heat olive oil (just enough to coat the bottom) and 1 T of butter. When the butter melts, add the shrimp and cook until just barely pink but not cooked all the way through. Remove shrimp and set aside.

Add your onion and garlic to the butter/olive oil mixture. You may need to add the other T of butter at this point and some more olive oil. Saute until soft and translucent.

While that is sauteing, chop your cooked shrimp into bite size pieces.

When the onion/garlic mixture is soft and translucent, add the white wine to deglaze. (this smells amazing) Let the wine evaporate and simmer for a few minutes then add in your tomato sauce and cream. Continue to simmer.

Toss in your fresh herbs (approximately 1 T of each), give it a stir and then add your shrimp back in. Continue to simmer and season with salt and pepper to taste. (the smell is even better now)

Serve over hot pasta!

VERDICT:
I don't even have anything witty to say. Just that you should make this tonight. And don't leave out the basil because it imparts such a divine flavor. You will think you have died and gone to heaven!

My one complaint is that this didn't make as much as I thought it would. We had just enough for 4 people and I really wish it would have made a little more. I will probably double the tomato sauce and cream next time so it makes a little bit more sauce.

Why are you still reading? Go to the store now!

SERVED WITH:
French Bread

SOURCE:

Banana Pudding

Last week we had dinner with Jenn and her husband. (You remember Jenn. She's the one that introduced me to Mirassou Pinot Noir.) Anyway, it was impromptu so I needed a quick dessert to throw together at the last minute. And apparently this is one of Jenn's favorite desserts of all time. It was a win-win scenario.

Sorry there's no picture. I forgot to take one.

INGREDIENTS:
3 c milk
2 pkgs instant vanilla pudding mix (4 svg size each)
3 bananas, sliced
1 box Nilla Wafers
8 oz Cool Whip, thawed

Pour milk into large bowl. Add dry pudding mixes. Beat with wire whisk 2 minutes or until well blended. Let stand at least 5 minutes.

While your pudding is setting, arrange wafers on bottom and up side of a 2-quart serving bowl, about 17-20 cookies. Put a layer of sliced bananas on top of the cookie layer. Then put a layer of pudding.

Repeat cookie/banana/pudding layer. Put a final layer of cookies on top then cover with Cool Whip.

Put in fridge until ready to serve. The recipes says at least 3 hours but I only did for about an hour and it was fine.

VERDICT:
Yum! This is one of my dad's favorite desserts so I've had it often. I got 2 thumbs way up from Jenn as well!

And this was even better the next day!

SOURCE:
Nabisco

Jambalaya


So here's something I bet you didn't know (all 8 of you that read this). Mr. ShoeFanatic and I have actually been friends for a whopping 8 years. And while we're getting technical, this jambalaya was technically the first meal he ever cooked for me. It was our freshman year in college for the Homecoming game. There was Everclear involved and this poor innocent 18 year old girl had no idea what she was in for. My memory from that night is quite fuzzy but I do remember this Jambalaya!


Mr. ShoeFanatic is quite famous (down here at least) for his jambalaya. He has a huge 15 gallon pot that we had someone clone into a cake for our wedding (klassy, I know). It's always super moist and the meat is melt in your mouth tender! I'm actually quite shocked that he's letting me post his recipe for the whole world to see! Of course that would be assuming that the whole world read my blog. Which they don't.


This is an excellent dish for your next tailgate!


INGREDIENTS:
2 1/2 lbs boneless pork shoulder, cut into 1 1/2" chunks
1 lb smoked sausage, sliced
1/2 c vegetable oil
1 bell pepper, diced
1 onion, diced
2 ribs celery, diced
3/4 c green onion, diced
1/2 c parsley, chopped
4 c medium or long grain rice (we use medium)
8 c water (for rice)
3 T Kitchen Bouquet
Seasoning (salt, red pepper, garlic powder, onion powder)
Water (for meat)


In a 5-6 qt heavy bottomed pot, heat up vegetable oil. Season pork to taste and brown thoroughly. Add a little water if it starts to stick.


Once browned remove to a bowl and add sausage to pot to brown. Once sausage has browned, add vegetables to sausage and cook until vegetables are tender. Add pork back into pot and stir to combine. Add enough water to cover and simmer until almost all liquid has reduced.


Add 8 cups water and season to taste, make sure it is a little on the salty side for the rice. Add Kitchen Bouquet to darken gravy. When liquid starts to boil, add rice, parsley and onion tops. Keep stirring until most liquid is absorbed then turn fire to low and cover for 20 minutes. Do not open!


After 20 minutes, remove lid, stir to fluff and put lid back on for 10 more minutes. Do not open!


After 10 more minutes, open lid, fluff and serve.


VERDICT:
Awesome as always! The meat is tender, it's spicy and goes great with a cold draft beer. What's also great about this meal is that it makes a lot and freezes really well. Just in case you get tired of eating it or can't give it away. But that won't happen.


SERVED WITH:
Black Eyed Peas
French Bread


SOURCE:
Mr. ShoeFanatic

Menu Monday

Guess what month it is!!!

My birthday month, that's what! Isn't that exciting? I swear I'll try to keep birthday posts to a minimum but I just can't make any promises on that.

Monday--Grilled Tuna
Tuesday--Chicken Fajitas/Lettuce Wraps
Wednesday--Crawfish Etouffee
Thursday--Mr. ShoeFanatic
Friday--Leftovers
Saturday--Shrimp Scampi (or something else with shrimp)
Sunday--Soup and Sandwiches (don't know what kind yet)

It's the 14th in case anyone wants to send me a card. Or flowers. Or chocolate!