Showing posts with label Vegetables. Show all posts

Tuesday, September 29, 2009

The Best Caesar Salad Ever


I didn't find the cord but I did figure out a way to get some halfway decent pictures straight from the memory card.

This recipe popped up in my Reader a while back and I've had my eye on it ever since. Mr. Shoe suggested having caesar salad with our garlic chicken and I immediately volunteered this recipe.

Now, I feel the need to make a couple notes about when you should NOT make this recipe:

1. Do not make when company comes over. You will want to lick the bowl and eat with your hands and it's just not a pretty combination.
2. Do not make when you are trying to keep your kitchen clean. I think I used every single bowl we own. It made quite a mess but was totally worth it.
3. Do not make when your husband is starving. He will eat all your croutons. And then you might have to kill him.

Otherwise, make this every single night for the rest of your life.

INGREDIENTS:
2 romaine hearts, separated into whole leaves & washed
4-6 garlic cloves, peeled
1/4 c + 5 T olive oil, separated
2 1/2 T mayonnaise
2 T lemon juice (we used 1 T red wine vinegar)
1/4 t Worcestershire
1/2 loaf french bread cubes
Salt & pepper to taste
Grated Parmesan cheese

Separate and wash your lettuce. Set aside.

Put your garlic cloves in a blender or small food processor. Pulse a couple times. Add in 1/4 cup of the olive oil. Pulse for a good 30 seconds.

Get a small bowl and a sieve or some type of other mesh kitchen utensil and separate the minced garlic from the garlic oil. Set both aside. You'll use them later.

In another bowl, whisk your mayonnaise, red wine vinegar (or lemon juice), worchestire and 1/2 of the minced garlic until well combined. Die from happiness because it's the best thing you've ever tasted in your life. Then set aside.

(If you end up doubling the dressing like I did, you'll use the other half of the garlic. If not, I guess you can throw it out but that would be a shame.)

Slice and cut your bread into 1-inch cubes. Place in a large bowl and drizzle with the garlic oil. Add a large pinch of salt and toss together to coat.
In a large skillet, toast them until they are golden brown. Put back in the bowl and set aside. (these could be a meal in themselves.)

It's FINALLY time to put all this together.

Take your lettuce, put it in a bowl. Drizzle with olive oil and sprinkle with salt & pepper. Toss to coat. Drizzle your dressing over the lettuce and again...toss to coat. Throw in your warm croutons and grate some parmesan cheese on top.


Serve in whole pieces and eat with your hands.
VERDICT:
Let me state for the record that I don't normally care for caesar salad. No real reason, it's just not something I crave.

But this caesar salad has changed my life! The red wine vinegar gave that dressing such a lovely punch of flavor. And the homemade croutons are the way to go. We seriously could have just eaten those for dinner.

This was fantastic and easy and you should make it as soon as possible!

And I take back #1. You should definitely make this for company. Maybe just cut up your lettuce so it's more fork friendly and you don't look like you are reverting back to caveman days.

SOURCE:
The Pioneer Woman

Monday, September 21, 2009

Potato Salad


I love potato salad pretty much any time of year. It's great in the summer at bbq's but even better in the winter with gumbo. NOTHING beats a cold scoop of potato salad in a bowl of piping hot gumbo! And that is how we had it on Saturday night.

INGREDIENTS:
8 med russet potatoes, peeled and diced
6 eggs
Mayo
Mustard
Relish (optional)

In a large stockpot, bring your potatoes and eggs to a rolling boil. Let cook until the eggs are cooked all the way through (~15 min) and the potatoes are soft and break apart with a fork.

Pour in a colander in the sink. Take the eggs out (they're hot!) and set them aside.

Drain all the water out of your potatoes and transfer to a large mixing bowl. Salt them and set aside. Take your eggs and peel them then cut them so you get the yolks out. Separate the yolks and the egg whites.

Dice your egg whites and throw them in the bowl with the potatoes. Take a fork, and mash up your yolks so they are nice and crumbly. Throw those into the bowl as well.

Get a big spoon and your jar of mayo. I have never really measured how much mayo I put. I usually just eye the consistency. Start with 2 or 3 heaping spoonfuls and with a spatula, fold the mixture together so that everything is well coated. Some of your potatoes will mash up during the folding and that's ok but you'd like for most of them to hold their shape.

Continue to add mayo as you need. I think I ended up using 5 or 6 spoonfuls total.

Did I mention this is not very good for you?

At the end, once you're happy with the consistency but think it needs a little something, squirt in a couple teaspoons of mustard and a little bit of relish. Fold that in and it should be perfect!

Transfer to a prettier dish and if you want to be fancy, sprinkle some paprika on top. It won't alter the flaver; I promise.

Enjoy!

VERDICT:
A hit as always. The consistency goes so great with gumbo and this is by far one of my favorite side dishes!


SOURCE:
Mom

Wednesday, July 22, 2009

Veggie Lo Mein


Anytime we order Chinese food, we always order lo mein. Always. So when Mr.ShoeFanatic talked to me about doing an "Asian night" I immediately asked if lo mein was part of the menu.

And of course it was. :)

INGREDIENTS:
6 oz lo mein noodles (we used linguine)
1 T oyster sauce
2 T soy sauce
1/4 c chicken broth
Pinch of red pepper flakes
1/2 T canola oil
1 small onion, chopped
2 bell peppers, seeded and sliced thin
1 c sugar snap peas
8 oz broccoli
8 oz. sliced mushrooms
1 c carrots, sliced
1 t sesame oil

Bring a pot of water to boil. Cook pasta. Drain and set aside.

In the meantime, make the sauce by combining the oyster sauce, soy sauce, chicken broth and red pepper flakes in a small bowl. Whisk well and set aside.

Heat the canola oil in a large nonstick skillet or wok over high heat. Stir fry each set of vegetables one at a time, until tender. Once they are just tender, take out and set aside. When all the vegetable are cooked, add them all back into the wok together.

Add the sauce to the pan, and then the cooked noodles. Toss the mixture well to coat everything. Drizzle with the sesame oil and toss once more. Serve immediately.

VERDICT:
This was for sure the winner in our night of Asian cuisine! I am in love with these veggies! They were cooked perfectly.

Mr.SF gets two thumbs way up for this! I can't wait to try it with chicken!

SERVED WITH:
Sesame Chicken

Sunday, July 12, 2009

Spinach & Artichoke Dip

I didn't take a photo of this as it was coming out the oven like I should have. I still have some in the fridge but I'm not sure how scrumptious it will look so this might be a pictureless post.

Everyone has a recipe for spinach and artichoke dip. So when my very good friend K told me she was bringing one to our couples shower last October, I didn't really think twice about it. But when she got here and I tasted it...whoa!

When making this, I usually end up messing with the quantities depending on how I want it to come out (creamier, cheesier, etc.). I left the artichokes out once for a friend who was allergic and it tasted just fine.

INGREDIENTS:
1 stick butter
1 med onion, chopped
2 10 oz packs frozen spinach, thawed and well drained
1 14 oz can artichoke hearts, drained and chopped
8 oz cream cheese
8 oz sour cream
1 c Monterey jack cheese, shredded & divided
1 c parmesan cheese, grated & divided
2 T Tabasco sauce (or more if you like it spicy)
Salt

Preheat oven to 350 degrees.

Melt butter in large saucepan. Add onion and sauté until soft. About 5 minutes. Stir in spinach, artichokes, cream cheese, sour cream, ¾ c parmesan and ¾ c Monterey jack, Tabasco and salt. Cook until well mixed.

Pour mixture into ½ quart casserole dish. (Dish can be made ahead up to this point.) Sprinkle remaining cheese on top.

Bake until warm and bubbly. About 15-20 minutes.

VERDICT:
Like I said...whoa! This is by far the best spinach and artichoke dip I have ever had. I think what makes me like it so much is that it's spicy. The Tabasco and Monterey Jack are an amazing combination!

I made this for a party on Saturday and everyone loved it! Definitely make this for your next get together!

Sunday, July 5, 2009

Broccoli & Cheese Soup


I've had this recipe bookmarked for a while and finally got around to making it this afternoon. I changed a few things from the original. Left out the potato, added all the butter in the beginning and doubled the broccoli and cheese. I think that's all I changed.

Everyone should stay tuned for Menu Monday tomorrow morning because I have a huge surprise to share!

INGREDIENTS:
5 T butter
1/4 onion diced
Salt
Black pepper
Nutmeg
1 T minced garlic
3 T of flour
4 c chicken broth
2 c frozen broccoli
1 c heavy cream
4 c colby jack cheese, shredded

In dutch oven melt butter over medium-high heat. Add the onion and a pinch (or two) of the salt, pepper and nutmeg. Cook until soft; add garlic.

Stir frequently while garlic cooks. Add the flour and stir until thoroughly mixed together. Slowly add the chicken broth while whisking constantly. Add broccoli and bring to boil. Reduce heat and simmer until thickened; about 20 minutes.
Mix in cream and bring to a low simmer. Add cheese and simmer until cheese is melted. Stir until it is mixed throughly.

Serve hot.

VERDICT:
This was good. Not great but good. I felt like the consistency wasn't quite where I wanted it to be but that could be because I didn't follow the recipe exactly.

I would make this again but I would definitely make some changes to better suit our tastes.

SOURCE:

Wednesday, June 24, 2009

Mushroom Alfredo Pasta


I always have a hard time coming up with side dishes. I would say that 95% of the dishes we cook are served along with pasta or rice. You see, while I married a carnivore, my husband married a carboholic. I can deal with no protein in a meal but you better give me my carbs!

I was racking my brain on side dishes for the stuffed chicken and thought of this while in the grocery store parking lot.

INGREDIENTS:
Olive oil
1/2 onion, diced
1 T minced garlic
8 oz crimini mushrooms, sliced
1 jar Classico Alfredo sauce
4 oz. heavy whipping cream
Fresh basil
Pasta

Boil pasta till al dente (or however you like it).

In a medium skillet, heat up your olive oil and saute onion and garlic until soft. About 10 minutes. Add mushrooms and cook until mushrooms are soft. They will probably release a lot of water so continue to simmer until the majority of the water is gone.


Turn heat to low-medium. Add alfredo and cream and continue to simmer for another 10-15 minutes. Watch it carefully so the bottom doesn't burn.

Add basil (I did it chiffonade because I like to act like Martha but chopped is just fine) and season sauce to your liking. Toss cooked pasta with sauce and serve hot.


VERDICT:
Well if I do say so myself, I am on fire tonight! Ah-mazing!

The basil really makes this dish. You can taste the freshness of it and it's soooo good.

WHEN you make this (yes, that's right I said when because "if" is not an option here) I recommend making this last. I started it early and the sauce had to sit while the water boiled which caused the sauce to get a little thicker than I would have liked. It still tasted fine but I wish it had been a little creamier.

SOURCE:
Me!

Thursday, June 11, 2009

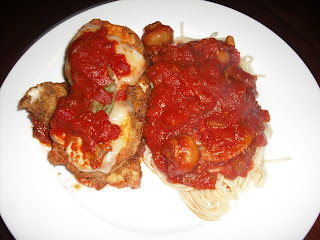
Chicken & Eggplant Parmesan


I don't think I've blogged about Mr. ShoeFanatic's garden yet? (note to self: start a post about the garden)

Well, it's fantastic. I'll get into more detail later but basically, it's producing eggplant as fast as we can cook it! Mr. ShoeFanatic requested eggplant parmesan this week and even though I've never cooked eggplant before, I accepted my challenge. The chicken was a last minute decision but an excellent one. Although, this could have easily been a great vegetarian dish.

INGREDIENTS:
3 med sized eggplants
Kosher salt
1 1/2 c AP flour
1 1/2 c Italian breadcrumbs
5 eggs, beaten
6-8 chicken breasts
Salt & Pepper
Canola Oil
1 bag shredded mozzarella cheese OR 1 block mozzarella cheese, sliced
Fresh basil leaves
1 batch Homemade Spaghetti Sauce

Rinse eggplant and peel. Cut lengthwise into 1/4 inch slices. Place a large colander in the sink. Arrange one layer of eggplant on the bottom and sprinkle evenly with Kosher salt. Repeat with remaining eggplant, salting until all eggplant is in the colander. Weigh down the slices with a couple of plates and a vase if you have one handy. Let drain for at least an hour. (The purpose of this is to have the eggplant release some of its moisture before cooking.)

While the eggplant is draining, prepare your spaghetti sauce so it can simmer. The aroma in your kitchen will rival Sophia Petrillo's.

In a wide, shallow bowl, combine flour and breadcrumbs (you made need more than called for, depending on how many slices of eggplant you have). Pour your beaten eggs in another wide, shallow bowl. Set these aside.

Place a large, deep skillet over med-high heat and pour about half an inch of canola oil. I used a candy thermometer to watch the heat. You want it to get up to about 400 degrees before you start frying.

Dredge the eggplant slices first in the egg, then in the flour mixture (side note: the original recipe called for flour then egg but to really get a good crust on it, I highly recommend egg then flour). Working in batches, slide coated eggplant into hot oil and fry until golden brown on both sides, turning once. Drain on paper towels.

At this point, preheat your oven to 350.

When all your eggplant is fried, take the chicken and season with salt and pepper on each side. Dredge in egg, then flour. Get your oil back up to about 350 and place the chicken in. BUT DON'T COOK IT ALL THE WAY THROUGH! You just want to brown the outside a little. If you cook it all the way through, it will end up dry and no one likes dry chicken.

So, brown the chicken, flip and brown the other side. Then take it out and let it drain on paper towels.

In the bottom of a 9x13 inch glass baking dish, spread a thin layer of spaghetti sauce. Place 6 chicken breasts in the pan (or however many you can fit). Top each breast with 2 eggplant medallions. Top eggplant with mozzarella slices. I used 3 slices per serving to make sure it was extra cheesy. I love cheese. Top the cheese with a fresh basil leaf (I also love the smell of fresh basil. I wish I could bottle it). Lastly, top each basil leave with a spoonful of spaghetti sauce.

Bake for 15 minutes or until chicken is cooked thoroughly. But I wouldn't go longer than 20 minutes or your chicken will be dry.


VERDICT:
Holy mother of all things green.

This is very possibly the best thing I have ever cooked. I don't even know where to start.

The eggplant was perfect. Soft on the inside and crispy on the outside. The chicken was SO moist! Usually only Mr. ShoeFanatic can achieve that kind of moistness in our kitchen but today, I surpassed him. And when they got married in that oven with the cheese and the basil. Oh, readers. It was heaven I tell you!

We'll definitely be having leftovers tonight.

SERVED WITH:
Pasta & Homemade Spaghetti Sauce

SOURCE:
Simply Recipes

Tuesday, June 2, 2009

Grilled Chicken Sandwich


I can honestly say I never thought I would be blogging about a sandwich. I mean, I like sandwiches but I wouldn't call them blog-worthy.

Until I met this sandwich. (I bet you're wondering why there's only half a sandwich in the picture. Keep reading.)

It all started with the bread. Oh, the bread. It's all I can think about. So I was sitting at work today thinking about how I didn't really want Lettuce Wraps like I said I did on Monday (don't judge; I've admitted to straying before). I wanted that bread. With chicken. Mr. ShoeFanatic's juicy grilled chicken. Oh yeah.

Then I remembered I had an avocado. This was coming together very nicely in my head. I also remembered seeing a sandwich on Pioneer Woman's blog that had intrigued me. So I headed there for further inspiration.

And boy was I inspired...

INGREDIENTS:
2 chicken breasts
Rub (below)
4 slices Sandwich Bread
Cream cheese (~1/2 cup)
Green onions, diced
2 slices cheese (we used provolone)
Cucumber, sliced (I like mine with the peeling still on)
Tomato, sliced
Lettuce, washed and torn
Roasted Red Peppers (jarred or fresh) or Avocado (I left this out)

RUB:
Salt
Black Pepper
Olive Oil
Rosemary

Season chicken with rub ingredients to your liking. Grill until cooked through. Set aside while you make the rest of the sandwich.

OR while your husband is grilling...Mix together your cream cheese and green onions with a fork. Spread on one side of each slice of bread.

Layer your cucumbers, tomatoes & lettuce on one slice. Layer your roasted red peppers (or avocado), chicken and a slice of cheese on the other slice. Put the chicken side on top of the veggie side.

Cut in half and enjoy.

VERDICT:
This was seriously one of the best sandwiches I have ever had. It turns out that I did not have an avocado so I used roasted red peppers instead. I am sure the avocado would be awesome though.

I have to say that I am so in love with thise cream cheese/onion mixture. I used low fat cream cheese so I'm wondering if it wouldn't be my new mayo. Hmm...

AND the tomatoes, cucumbers and green onions were all grown in our garden! So fresh!

I was so excited about my sandwich that I started eating it before I took a picture. And the whole time I'm eating all I can think about is how I couldn't wait to blog about it! Then I realized I had no pic so I had to stop eating long enough to take one of the other half. Before I engulfed it of course.

I can't wait to have this for lunch tomorrow!

SERVED WITH:
Cucumber & Tomato salad

SOURCE:
Pioneer Woman
Me!

Friday, May 8, 2009

Mashed Potatoes

*picture to be added later*

My mom has been making these for years. They are so yummy and not difficult at all. I will never make instant because the extra time spent on these is worth it.

INGREDIENTS:
8-10 medium potatoes, peeled and cubed
1 stick butter
Milk
Salt

Bring your potatoes to a rolling boil in a big pot of salted water. Let them boil for at least 10 minutes. You can check them with a fork to see when they are tender enough.

Drain in a colander. Put potatoes, butter and at least 1/2 c milk in your stand mixer and using the paddle attachment, turn it on med speed. Add milk and salt to reach desired consistency and taste.

VERDICT:
Just like Mom used to make!

SOURCE:
Mom

Thursday, May 7, 2009

PW's Creamed Spinach


So, my good friend (and fellow blogger) Brittany, turned me on to Pioneer Woman. And now I am obsessed. I want to be just like her!

So when I came across her recipe for Creamed Spinach on the same day Mr. ShoeFanatic requested steak...well, if that's not fate, I don't know what is.

INGREDIENTS:
1 stick + 3 T butter
8 T AP flour
1/2 sm onion, finely chopped
3 garlic cloves, diced
2 c milk
24 oz baby spinach
Salt, black pepper & red pepper
Nutmeg, freshly grated

Melt 1 stick of butter in a pot. Sprinkle in flour and whisk together. Cook over medium heat for five minutes or until light golden brown.

Add onion and garlic and stir together, cooking for another minute. Pour in milk, whisking constantly, and cook for five minutes while you cook the spinach.

In a separate pot, melt 3 tablespoons butter in a separate pot. Add spinach in increments until all incorporated, and cook until wilted but not soggy, about 4 to 5 minutes.

Season the cream sauce with salt, pepper, and nutmeg. Add spinach to the cream sauce, stirring gently to combine.

At this point, it smelled and looked absolutely delish. The creaminess was perfect. But Mr. ShoeFanatic wanted to taste it for seasoning. Fair enough. We decided it needed more salt. Here is where things started to go south.

Before I knew what was happening, my husband had literally poured half the box of salt in my creamed spinach! My jaw hit the ground as he smugly stated, "Just trust me."

So I picked my jaw up and trusted him.

And it was too salty. Much, much too salty.

So he added more milk.

Still too salty. And now too liquidy.

So he added more wilted spinach.

And it was just a tad less salty. But still very liquidy.

Bottom line: The man ruined my creamed spinach. And then he served me fatty meat. I ate the majority of my potato though.

So I'm not doing a verdict for this post. I think it could have been a fantastic dish and I am looking forward to making it again. Alone.

SOURCE:
The Pioneer Woman
Wednesday, May 6, 2009

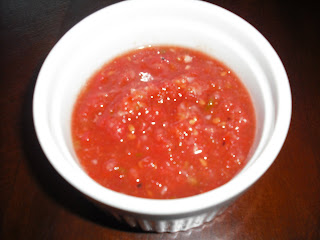
Homemade Salsa


Mr. ShoeFanatic has been yenning to make homemade salsa for quite some time. When I mentioned making Shrimp Tacos, he jumped at the chance to whip this up. It didn't take long at all and was amazingly fresh.

INGREDIENTS:
2 cans diced tomatoes
1 whole tomato, quartered
1/2 red onion, chopped
4 garlic cloves, chopped
1/4 c pickled sliced jalapenos
Juice of 2 limes
1 t sugar
1 t red wine vinegar
1/2 t salt
10 grinds fresh pepper
1/4 t granulated garlic
1 bunch cilantro (we left this out)

In food processor, pulse canned and fresh tomato until finely chopped. Remove tomatoes and pulse onion, garlic, cilantro and jalapeno until finely chopped.

Combine the processed mixtures and the remaining ingredients and refrigerate before serving. The longer this sits, the better the flavor.

VERDICT:
Hands down, this is the Best Salsa Ever. There were no crunchy raw onions yet it was chunky. Everything was very fresh. And it was so better the next day!

Eat your heart out, El Paso.

SOURCE:
Texas Highways Cookbook

Friday, May 1, 2009

Pasta Salad


Update, 5/25/09: Finally got a picture up. Even if it is a crappy one. I'll try to take a better one later.

Update, 5/2/09, 12:00pm: Apparently there will not be a picture. Mr. ShoeFanatic thought it was SO good that he ate all the leftovers.

Spring has officially sprung here. I love, love, love pasta salad but for some reason, people always tend to put raw onions in it. And I hate raw onions. I started searching for a recipe a while back in hopes that I would either get invited to a BBQ or we would host one.

Ask and you shall receive! We were invited to a Private Practice finale/BBQ last night (can we all say cliffhanger?!) and I literally jumped at the chance to make pasta salad.

I didn't actually measure anything. I just eyed whatever looked right.

INGREDIENTS:
1 bag pasta shells
1/2 bag matchstick carrots
1/2 bag frozen peas, thawed
1 block colby jack cheese, cubed
1 cooked, ham steak, cubed

DRESSING:
1 packet dry ranch dressing mix
mayonnaise
sour cream
Splash of red wine vinegar

Bring a large pot of salted water to a rolling boil. Meanwhile...Depending on how long your carrots are, run a knife through them so they are bite size.

Boil noodles for approximately 7 minutes. Throw in carrots and boil for another 2-3 minutes.

Pour pasta/carrots into a colander but DO NOT RINSE. You want the starch so the dressing sticks better. Set aside. Or put in the fridge so it can start cooling down. If you do this, you'll want to run your spatula through it fairly often as the outside pasta will cool but the inside pasta won't. Makes sense? Good.

While water is boiling and noodles are cooling...

Whisk together ranch, about a cup of mayo (you will probably add more later) and 2 heaping spoonfuls of sour cream. Whisk this together until you have the desired consistency. When the consistency is right and you feel like it tastes good but it could be just a little better...throw in that splash of red wine vinegar. Whisk some more and it should be just right.

In a large bowl, mix your peas, ham, cheese and cooled pasta/carrots. Fold in the dressing, making sure you coat all the shells. Stick it in the fridge until you are ready to serve.

VERDICT:
Yum, yum, yum. This was sooooo good! I was actually worried about the dressing because originally the ranch flavor was really overpowering but then Mr. ShoeFanatic swept in and saved the day with his additions of sour cream and red wine vinegar. That sealed the deal.

This recipe is definitely one of those "free for all" kind of dishes. You could use whatever veggies you have on hand and I also think that you could get away with just using a bottle of creamy italian salad dressing.

Whatever you do, make this soon.

Source:
Amber's Delectable Delights

Tuesday, April 28, 2009

Cream of Asparagus Soup


Wow, Cara is right. Soup is very hard to photograph. Ignore my attempt to be classy with the creepy looking floating asparagus.

So yesterday, I discovered Google Reader. And one of the first things I saw pop up was this recipe. Which was awesome because I love asparagus, I had asparagus sitting in my fridge at home and I was looking to add another course to my anniversary meal.

I should let you all know that even though the actual recipe was really healthy, I did not go as healthy as I should have. So for the true low fat version, click here. For the just a little bit more fat version, keep reading.

INGREDIENTS:
Olive oil
1/2 small onion, chopped
4 garlic cloves, minced
1 1-lb bunch fresh asparagus
Salt & pepper
2 tsp my version of Penzey's Greek seasoning (below)
2 cups chicken broth
12 oz low fat cottage cheese
1/4 cup 1% milk

My version of Penzey's Greek seasoning (1 tsp of each):
Kosher salt
Black Pepper
Garlic Powder
Oregano
Lemon Juice

Break off the tough ends of the asparagus and discard. Wash asparagus and chop into small pieces, about 1/4-1/2" in length.

Heat olive oil in a saucepan over medium heat. I put just enough to cover the bottom of my pot. Add onion and garlic and saute until softened and translucent. Add asparagus, salt & pepper, and Greek seasoning and stir to combine. Add chicken broth; this should be enough to just cover the vegetables in the pan. Bring to a boil, then reduce heat, cover, and simmer for about 10-15 minutes until vegetables are tender.

While that is simmering...Blend together the cottage cheese and milk in a blender or in a separate container using an immersion blender, until completely smooth (I used my blender). Set aside.

Remove the soup from heat and process until smooth, either using an immersion blender or by transferring to a food processor or blender (used the blender again). Return to medium-low heat and gently stir in cottage cheese mixture.

Bring to a boil, and cook for a few minutes to let it fully thicken. Lower back down to a simmer. The longer you let it simmer, the better it will be. I also ended up adding more salt at the end but not a lot. Just enough to our liking.

VERDICT:
This was my very first attempt at soup and I have to seriously pat myself on the back. This was so amazingly good! And so amazingly easy! That Greek seasoning mixture definitely brings all the flavors together and the creaminess was just right.

The only thing I would do differently next time (and there will be a next time) would probably be to pass it through a sieve before returning it to the heat. I found it was just a little, tiny bit grainy. Not enough to keep me from practically licking the bowl clean but just enough to make my OCD flare up.

Yes, I will definitely be making this again.

SOURCE:
Cara's Cravings

Monday, April 13, 2009

Roasted Asparagus


ETA: I made these again so I got a chance to take a picture before it disappeared!

I love asparagus. Fortunately, I am not one of those people who gets smelly pee after eating it so I really could eat it every day. Was that a TMI? Oh well.

I found this recipe last year for Easter and we both loved it. I don't actually measure anything for this. I just do whatever looks right.

Ingredients:
1 bunch of asparagus
Olive oil
Basalmic vinegar
Salt & Pepper

Preheat oven to 475.

Cut off the ends of asparagus and rinse well. Lay them out on a pan with a lipped edge.

Pour/sprinkle olive oil and basalmic vinegar. Add salt and pepper to your desired taste.

Roast for 10 minutes or until tender.

Verdict:
Huge hit! So huge that we didn't have any leftover and I didn't take a picture beforehand. :( Sorry!

I really think the secret here is using good basalmic vinegar. I know I've mentioned this before, but the one we use is from Olivier in St. Helena, CA. We got it on our honeymoon and it is like heaven in a bottle! The one we got was actually the V.S.O.P vinegar. I don't know what that stands for but it's different from the regular basalmic vinegar.

Definitely don't let this sauce go to waste! Soak it up with bread or lick your plate. Just don't throw it out!

Source:
Food Network

Sunday, April 5, 2009

Chicken Fajitas


I swear some days I think we are part Mexican since we have Mexican food at least once a week. I L-O-V-E love these fajitas. Mr. ShoeFanatic cooks the veggies in a cast iron pan on the grill and they are just a little crunchy. And then they make their own juice that is so freaking good...I'm salivating as I type this.

You should make this tonight.

Stop reading and go to the store.

Now!

Ingredients:
4-6 chicken breasts
Seasoning (salt, pepper, garlic powder, onion powder, smoked paprika, kosher salt)
tortillas
4-6 bell peppers, sliced into strips
1-3 onions, sliced into strips
8 oz mushrooms, sliced
shredded cheese
sour cream (optional)

Chicken:
Season chicken with first 5 seasoning ingredients. Grill on each side for approximately 7 minutes or until it is cooked all the way through. When it is done, sliced it into thin strips.

Veggies:
Put your bell peppers, onions and mushrooms in a cast iron skillet on the grill. Sprinkle with kosher salt and pepper. Toss with tongs to make sure they are all seasoned.

Cook veggies for 15-20 minutes or until they are at your desired doneness. We like ours with just a little bit of crunch to them.

Heat tortillas in the microwave for approximately 30 seconds between 2 damp paper towels.

To Assemble the Perfect Fajita the ShoeFanatic Way:
1. Take a tortilla and spread a thin layer of sour cream on it
2. Put a strip of chicken down the center
3. Put a strip of veggies down the center (I like a lot of veggies)
4. Sprinkle with cheese
5. Fold together
6. Inhale fajita and repeat as often as necessary.

Verdict:
Yep, these are still as good as I remember. The crunchy veggies are seriously the bomb dot come. There are really an infinite amount of possibilities with these. Squash, zucchini, carrots...the list goes on. And if that's not enough to convince you, they are super easy to make and clean up is a breeze.

Served With:
Margaritas
Mexican Rice (I am apparently losing my mind. I forgot to make this but I'm sure it would have been great.)

Source:
I guess Mr. ShoeFanatic but only because he has mastered those yummy peppers. Although if someone can tell me who actually invented fajitas, I will be mighty impressed.

Saturday, April 4, 2009

Tortellini, Spinach & Mushrooms with Asiago Cheese Sauce


Wow, that's a long title.

During Lent, the no meat on Fridays thing can be somewhat of an issue. If we're lucky, we get to eat boiled crawfish. But since that can get pricey, it doesn't happen every Friday. Our next option would normally be to cook seafood at home (shrimp, fish, etc.) but we were out this week.

Hmm...

It doesn't help that I married a "man's man" who thinks that if he doesn't have protein every single day, he might die. (enter eye-roll here)

I've been wanting to cook tortellini so even though it took a while, I finally convinced Mr. ShoeFanatic that it would be just as filling as....well, as pasta.

Ingredients:
1 pkg cheese tortellini
2 T butter
4 cloves of garlic, diced
1/2 sm onion, diced
8 oz mushrooms, sliced
3 T flour (this is too much, only put 2 T max)
Dash of white wine*
2 c half & half (you can also use milk or cream)
Salt & pepper
2 c shredded cheese; I used Asiago & Parmesan
1 box frozen spinach, cooked

*Here's the general rule of cooking with wine. If you wouldn't drink it, don't cook with it! Many bad meals have resulted from this. I too have bought the cheaper wine thinking that since it's being cooked in, it wouldn't make a difference. Not true!

Cook the tortellini as directed.

Melt your butter and saute the garlic, onions and mushrooms until soft. About 10 minutes; maybe more for the mushrooms. (Enter smell-o-net here because at this point my kitchen smelled heavenly!)

Add flour and stir well. Add the wine of your choice and stir. Pour in half & half and add spices. Let it come to a steady simmer.

Add cheese and stir so the cheese is melted and thoroughly mixed in. I also tasted at this point to make sure the sauce was how I wanted it.

Add spinach, stir. Then add in tortellini and fold gently so it doesn't break apart the noodles but it's coated in the sauce.

Enjoy!

Verdict:
Yummy, yummy, yummy! This was so good! You really must try this. It wasn't as creamy as I wanted it to be but I think that's because I was being impatient and added too much flour (patience is not my strongest suit). I would definitely only add 2 T of flour next time. This recipe has so much potential to add chicken, different veggies, different cheeses. It is very rich and I think Mr. ShoeFanatic said something about it making a good side dish but I was too busy stuffing my face to even notice he was talking.

Yes, we will definitely be making this again.

Served With:
Asparagus (I actually forgot to cook the asparagus but it would be an excellent side to this)

Source:

Thursday, April 2, 2009

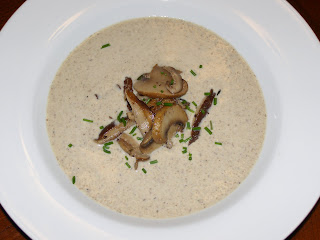
Cream of Mushroom Soup


I have mentioned our Napa honeymoon a couple of times already. It was fantastic! The wine, the scenery.....and the food! On our last night there we ate dinner at The Martini House where Chef Todd Humphries is known for his love of mushrooms. This entire dining experience was nothing short of magestic! They actually have an open kitchen so while you are dining you can see what is going on. It was so cool to see everyone in action!

One of the best things that we had was a bowl of his cream of mushroom soup. When we got home, Mr. ShoeFanatic busted out our handy dandy immersion blender* and went to work. Here's how it went down.

Ingredients:
1 lb fresh mushrooms, sliced
4 T butter
4 cloves garlic, chopped
1 shallot, minced
1 t fresh thyme, chopped
2 T all purpose flour
4 c chicken broth
1 c whipping cream (not heavy)
Salt & Pepper to taste
Chopped chives for garnish

Melt butter in large dutch oven and saute garlic and shallots for about a minute. Add mushrooms and thyme; saute another 3-4 minutes or until they are soft. (If you want to garnish your dish with sliced mushrooms like we did in the picture, take a few out of the pot at this point.)

Add flour and cook; stirring for approximately 1 minute. Add chicken broth, stirring continuously and bring to a boil. Reduce heat and simmer for 5 minutes.

Whisk cream into the soup and season to taste with salt and pepper. Once you reached your desired taste, blend in a blender until smooth. (see note below about blender v. immersion blender)

Garnish with chives and mushrooms.

*We have made this twice. Once with an immersion blender and once with a regular blender. Both were good and the taste was not altered by either BUT we found that the one made with the regular blender was a little bit prettier and smoother. The one done with the immersion blender looked a little grainy. It didn't taste grainy but it looked it. The one in the picture was done with the regular blender.

Verdict:
When you finish eating this you will want to do one of two things:

1.) Lick your bowl
2.) Bathe in the soup

Whichever you decide is totally up to you. We promise not judge you.

Source:
The Martini House
AllRecipes.com

Tuesday, March 31, 2009

How we saved $50

On Sunday I was tired and didn't cook. So after much intense discussion (that he was losing) about whether we were going to order sushi or go pick up steaks at the store, Mr. ShoeFanatic took it upon himself to just throw something together. Here's how it went down:

Remember the side of stir fry peppers we had with the apricot porkchops? He cubed those.

Remember the pulled pork sandwiches?
He shredded some more pork (sans BBQ sauce).

Remember the Blueberry & Raspberry Chipotle Sauce?
He heated that up.

So we had pork quesadillas and if I do say so myself, they were pretty damn awesome. And that my friends, is how we saved $50.

I married a very resourceful man.

Monday, March 23, 2009

Roasted Red Pepper Orzo

I have been wanting to try an orzo pasta dish. So I did my thing where I find several recipes and then make them my own. I love roasted red pepper and this is really easy. I will definitely make this again!


Ingredients:
2 T butter
½ onion, diced
3 cloves garlic, diced
1 c orzo pasta
2 c chicken broth
Salt & pepper to taste
½ c grated parmesan cheese
1 roasted red pepper

In a medium saucepan, melt your butter and sauté the onions and garlic, about 10 minutes. Add the orzo and coat well. Pour in your chicken broth and bring the mixture to a boil. When you have a decent boil going, lower the fire to low, cover and let cook for 15 minutes. I should add here that I have a crappy stove so I kept checking it but you really shouldn’t do that.

Here’s something else you shouldn’t do. If you happen to be cooking Spinach Salad Dressing at the same time you should definitely pay attention to what you are doing! I do not care how enthralling your conversation with your husband is! Do not pour ¼ c apple cider vinegar into the orzo! It will ruin it and you will have to start over! Don’t ask me how I know this.

Anyway...

While your pasta is cooking, roast your red pepper. We did ours on the grill but if you are lucky enough to have a gas stove, you can do it there too. Roast it until the skin is black. Place in either a Tupperware container or glass bowl and cover to let it sweat; about 20 minutes. Then just deseed and chop it like you normally would. I should also add here that Mr. ShoeFanatic did not cook this as much as he should have. Apparently, we were both having an off night.

Ok, once your timer goes off, check on the pasta. If it’s too liquidy still, turn the heat up to boil some of the broth off. But stand there and stir and watch it while you do that so it doesn’t burn the bottom (I have a complex about that). If the pasta isn’t cooked enough, add a little more chicken broth and let it cook longer.

Once you are happy with the consistency, season with salt & pepper to your tasting. Stir in your cheese and red pepper and enjoy!

Verdict:
I really like this! I think if Mr. ShoeFanatic had cooked the pepper like he was supposed to it would have been better but other than that, it was really good. I really liked the cheesiness of it.

Source:
Le Petit Pierogi
Mary Ellen’s Cooking Creations

Spinach Salad Dressing

My mom gave me this recipe a couple years ago (I have no clue where she got it) and I love it! I think the flavor of this dressing is really good and when you add different toppings to your salad, it makes it that much better. Very easy too!


Ingredients:
1 c Olive oil
1/4 c sugar
1 egg
2 T Lea & Perrins Worchestire Sauce
1/4 red onion, diced
1/4 c apple cider vinegar
Hard Boiled eggs, 1 per person

Combine all ingredients in a small saucepan. Whisk together and cook over low-med heat. Stir continuously so you don't scramble the egg! Cook for approximately 15-20 minutes. It will start to get thick; that’s when it’s ready.

Ladle over fresh spinach and sliced egg. Add the toppings of your choice. We like feta, pecans and berries.

Verdict:
So I’ve been cooking this ever since I started dating Mr. ShoeFanatic (that’s 3 years in case anyone’s counting) and he has always loved it. Last night he tells me that he never really cared for the dressing but he wanted to make sure we were married before he told me this. Jerk.

Regardless of his ridiculous opinion, I love it and could easily eat this as a side to every meal!

Source:
Mom